Most of mechanisms was covered last year in S3. However we have learnt some new things this year:
Velocity Ratio/Linear Speed:
Like last year we had to use Velocity Ratios to work out rotational speed and we looked at how to then find the linear speed of a rope being wound around a drum.
Here are the two examples we looked at in class:
VR = 10/40 x 10/15
=
1/6 (or 0.167)
SPEEDdrum = SPEEDmotor x VR
= 500 x 1/6
= 83.3 rev/min
=
1.39 rev/sec
C = Pi x D
= 3.14 x 250
= 785mm
=
0.785m
SPEEDrope = SPEEDdrum x C
= 1.39 x 0.785
=
1.09 m/s
VR = 1/2 with 2 ropes
SPEEDload = SPEEDrope x VR
= 1.09 x 1/2
=
0.55 m/s
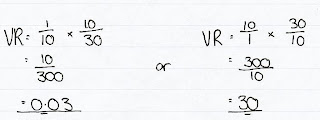
VR = 10/30 x 10/40
=
1/12 (or 0.083)
SPEEDdrum = SPEEDmotor x VR
= 200 x 1/12
= 16.6 rev/min
=
0.27 rev/sec
C =
π x D
= 3.14 x 300
= 942mm
=
0.942m
SPEEDrope = SPEEDdrum x C
= 0.27 x 0.942
=
0.254 m/s
Moments:
A moment is the turning effect of a force. Because a force is being applied to a system, it works like a lever. So the further away from the pivot the force is applied the greater the moment. Hence you calculate a moment:
Moment = Force x distance
Moments work on the principle of equilibrium. This means that as the system is not actually moving, all the forces and moments are balanced. The three laws of equilibrium are:
ΣACM = ΣCWM
ΣFup = ΣFdown
ΣFleft = ΣFdown
Using these laws we can find out unknown forces or distances. These are the revision questions we looked at today:
Calculate the reaction forces in the car shown below.
First it might be useful to draw the Free Body diagram to show clearly how the forces are acting on the car. However you will notice that you are given the mass of the people in the car, not their weight, therefore to find the forces the people will exert on car, you must use W = mg:
F
90 = mg F
60 = mg
= 90 x 9.81 = 60 x 9.81
=
883N =
589N
Now that you know the forces, you can start to use the laws of equilibrium. Make R
1 the pivot point so that you can work out R
2:
Remember that a moment = force x distance from the pivot. And you must work out all moments separately, you can't add them without multiplying them by their individual distances first.
ΣACM = ΣCWM
R2 x 3.5 = (883 x 1) + (589 x 2.5)
3.5R2 = 883 + 1472.5
3.5R2 = 2355.5
R2 = 673N
Now that we know R
2, we can use the equal forces law to work out R
1.
ΣFup = ΣFdown
R1 + R2 = 883 + 589
R1 + 673 = 1472
R1 = 799N
Then we looked at a car with a caravan on the back. In this question the tow bar exerts a force both on the car and on the caravan.
To tackle this question you must consider the car and the caravan separately. First look at the caravan to work out the force in the tow bar P:
So if R
3 is the pivot, you can see that the person is exerting a clockwise force and P an anticlockwise one.
ΣACWM = ΣCWM
P x 3.5 = 200 x 1
3.5P = 200
P = 57.1N
And using this we only have one unknown in the caravan. So we can work out R3:
ΣFup = ΣFdown
R3 = 57.1 + 200
= 257.1N
Now we can work out the forces in the car. This is the free body diagram for the car:
You will notice that as P is acting up from the car. This is because there is tension in P and it is being stretched. The internal forces act to keep P from stretching. So it acts away from both the car and the caravan.
We need to use moments to find the reaction forces. I would start by making R
1 the pivot, so that we can find R
2:
ΣACWM = ΣCWM
(R2 x 2.5) + (P x 5.5) = 500 x 1
2.5R2 + (57.1 x 5.5) = 500
2.5R2 + 314 = 500
2.5R2 = 186
R2 = 93N
Now we can use the equilibrium in the vertical forces equation to find R
1:
ΣFup = ΣFdown
R1 + R2 = 500
R1 + 93 = 500
R1 = 407N
The next question is slightly easier as it only involves one system, the desk.
Again, the best place to start is by drawing the free body diagram:
Taking moments about R
1, we can find R
2:
ΣACWM = ΣCWM
1 x R2 = (200 x 0.5) + (50 x 1.5)
R2 = 100 + 75
R2 =175N
Then using equilibrium in vertical forces we can find R
1.
ΣFup = ΣFdown
R1 + R2 = 200 + 50
R1 + 175 = 250
R1 = 75N
Windlass:
A windlass uses a handle to magnify force. This can be demonstrated using the Velocity Ratio equation:
Velocity Ratio = Distance moved by effort / Distance moved by load
The distances moved are found by working out the circumference (C = 2
π r). As the handle has a greater circumference you need to put in less force to lift the load when using the windlass.
Torque:
Torque is a turning force, or the turning effect of a force. This means that when a force is applied to a gear or pulley it is magnified by the distance that force is applied is from the axle, i.e. the radius. Thus, the bigger the pulley or gear, the bigger the Torque.
Therefore torque can be found using the equation:
T = Fr
Where T is Torque and is measured in Nm, F is the force, and r is radius.
Power:
Power in mechanical systems are based on P = E/t. Energy is force x distance and we base our power calculations on revolutions per second so time = 1. Because this is a turning force we need to know the torque. And the distance is the number of revolutions per second.
Hence mechanical power:
P = 2πNT
P is power measured in W, N is number of turns (rev/s) and T is Torque.